
ExQueues Shell Queue is an application that allows a user to 'queue up' various file operations using the Windows Explorer (through the Context Menu) or in other file managers such as Directory Opus (using DDE). In particular, multiple sequential PAR2 repairs & RAR extractions are supported along with source file deletion, as well as sequential file moves and copies, and deletion.
Version 0.3.9 Released!
Version 0.3.5 Released!
Version 0.3.4 Released!
New Version 0.3 Has The Following Bug Fixes And Enhancements
ExQueues Shell Queue was conceived and developed by Slain Jamison Wilde.
This Installer is what most users will wish to download. After installation, you should restart Windows to activate the context menu extensions. Alternatively, use the Task Manager to kill explorer.exe and restart it (as well as Directory Opus if you are using that). NOTE: This application is currently Windows XP or newer compatible only (cause I'm lazy but I still wanted alpha channel bitmaps).
While the beginnings of an in-application editor for the XML configuration is in place, it is currently not complete,
and may not be for a while. So here are the important changes you need to make to the XML config. This file will be located in your
c:\Documents and Settings\%username%\Application Data\ExQueues\Config.default.xml file. If you make extensive changes to this file, and wish to keep them the next time you update ExQueues, copy or rename this file to config.xml and the installer will not overwrite your changes.
The config file itself is fairly well documented in comments and tips. The key areas to change are shown below. Setup your basic directories for the Extraction, Copy and Move destinations in the varDests variable. Note that individual paths may be enclosed in double quotes if needed. You may also use the new special folder indicators when specifying folders in either the varDests varaible or any of the <MenuDestination>s in the config file. These special folders are specified by _here _subfolder and _browse. Use commas to separate them from other paths as you would any other folder.

A patched version of par2.exe is now included in the installer. The following paragraph refers to previous versions that did not include par2.exe, or if you are having some conflict with different versions of par2.exe on the same machine.
The only other area that really needs to be set or checked before using ExQueues is the par2.exe location. If it is in the default path already you can leave it as is. Otherwise, you will need to change the path to the par2.exe. par2.exe can be found from the links at the bottom of the page. The current version you would need on Windows is 'par2cmdline-0.4-x86-win32.zip' from the downloads page. At some point I may move more of the par2 code into ExQueues to get rid of this external dependecy. Leave the commandline options alone unless you know what you are doing.

Example using the Explorer right click context menu to queue up two par2's for processing. (Note: You don't have to pick the small PAR2 file, any of them will do, including the ones with 'vol01+1' in them. Just pick one from each set though.)

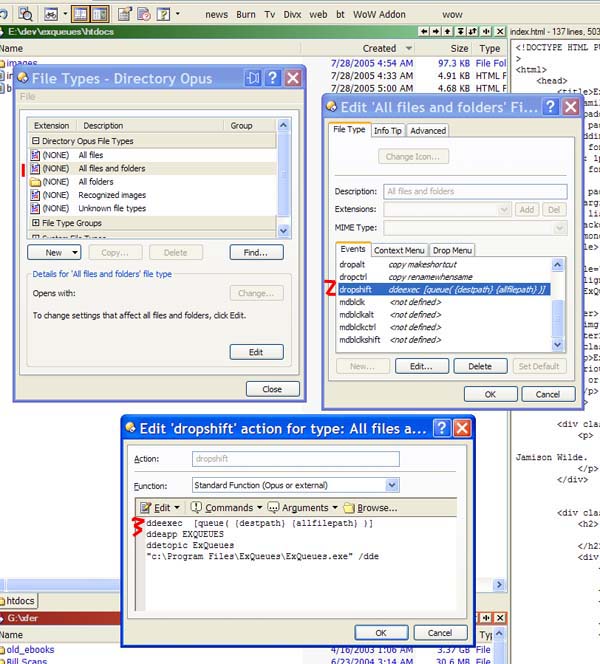
			ddeexec  [queue( {destpath} {allfilepath} )]

			ddeapp EXQUEUES

			ddetopic ExQueues

      "c:\Program Files\ExQueues\ExQueues.exe" /dde

			ddeexec  [delete( "" {allfilepath} )]

			ddeapp EXQUEUES

			ddetopic ExQueues

      "c:\Program Files\ExQueues\ExQueues.exe" /dde


For general support please refer to our forums.
Please report bugs here.
No mailing lists at this time.
ExQueues Shell Queue: sourceforge project page.
par2cmdline (par2.exe): par2 command line utility needed since no DLL is available from QuickPar.
Bjarke Viksoe's WTL Widgets and Samples: Helpful widgets and examples used in this project .
WTL: The Windows Template Library Sourceforge page .
Windows Intaller XML: The Windows Installer XML Sourceforge page .
PugXML: The pugxml homepage.